
There are many ways to make a note of where something is. And, that is the problem – too many ways. When you need to find something, you will first have to remember where you made the note. The Debby NotesTM mobile app is dedicated to help you remember where things are.
Debby Notes screens
There are three main screens in the Debby Notes mobile app – Notes, Settings and About. There are three tabs at the bottom of the main screens providing navigation between the Notes page, the Setting page and the About page. Touch these tabs to move between the pages (more info about the pages later). Please note that there could be more information on the page that could be displayed on the screen. Scroll up and down the screen to reveal more contents from the page. The navigation tabs will always be available to navigate back and forth between the Notes, Settings and About pages.
Notes page
The default screen of the Debby NotesTM mobile app displays the Notes page which is a list of items that you want to remember. The Notes page will be displayed when the app is launched.
There is a Notes title bar on the top of the Notes screen. On the right side of the title bar, there is a “+” circle to add more items. Next to it, on the left, is the place for a “link” icon. This will be turned on when you are signed in and the app is connected to the Debby LinkTM backend (more on this later).
Hint: The displayed items will be listed in order they are added or last updated. The newly added item appears on the top by default, but can be changed to appear on the bottom of the list (more on this later).
Hint: You do not not need to create and sign in to an account to start using the Debby NotesTM mobile app. Items that you have added will start to show up on the list. When you do sign in to an account (more on this later), all items you have added will automatically be recorded in your private cloud storage area dedicated to your signed in account.
Adding a new item (by touching the “+” circle on the title bar)

A “Create Item” screen will pop up. Enter the item description and the location where the item is placed. If you click on the “Keep Private” selector, the Keep Private circle will be “checked”. An item with Keep Private check mark will cause the item to turn red on the item list. Also, when a user ask Alexa where the item is, Alexa will ask for a passphrase before releasing the location information (more on setting the Passphrase later).
Notice that there is an automatic Last Updated On entry on the Create Item screen. This is the current date and cannot be edited. This records the date when the new item note was created.
Touch the “Save” button to save the item and its location or touch the “Cancel” button to cancel adding a new item.
Hint: Item Description and Location information can be entered in the different languages that is set to be available for the mobile device. It is not limited to English only. Also, once the soft keyboard comes up, use whatever best method for you to enter the text, for example, you can touch the “mic” icon to dictate the text instead of typing.
Edit Item
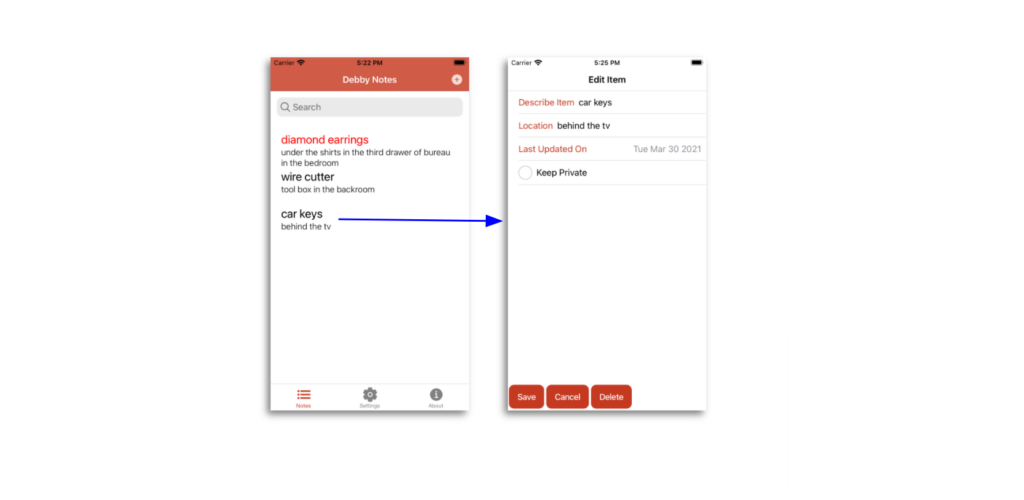
Touch on any item on the list and an “Edit Item” screen will pop up. Touch any text to edit it or touch the Keep Private circle to check or uncheck it.
On the bottom of this screen, touch the “Save” button to save the edited information or touch the “Cancel” button to cancel editing. If you want to delete the item from the list, just touch the “Delete” button.
Caution: Touching the “Delete” button will immediately remove the item from the list.
You can use the Edit Item screen to check when the item note was created by looking at the Last Updated On entry. Please note that the Last Updated On entry will be updated with the current date if the item was updated and saved.
Search for an item
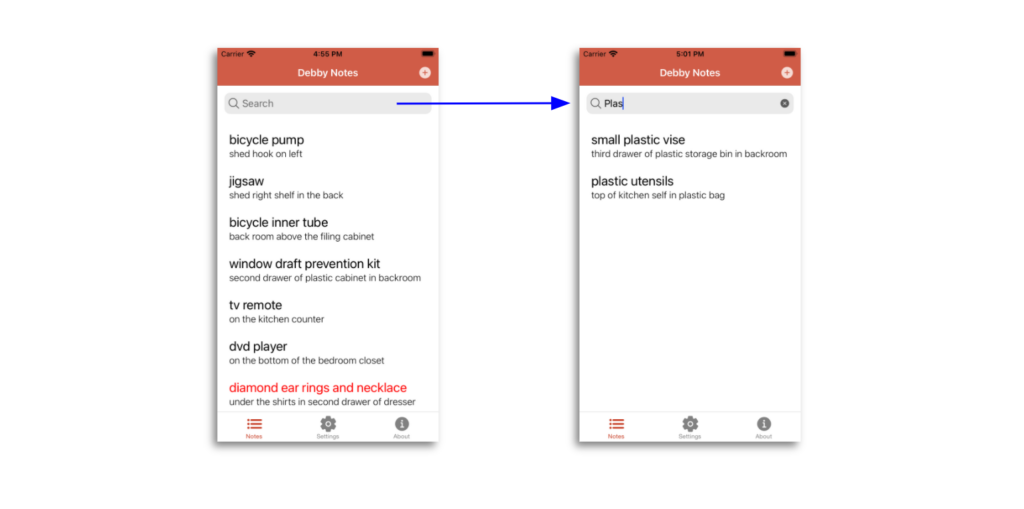 Touch the Search bar to bring up a keyboard. Enter text by touch the keys on the keyboard or whatever method that you are used to input text, including using the mic to dictate text. As text is being typed in, the list of items will be reduced to match the names of items that contains the string of characters entered into the search bar. In the illustration above, “plas” was entered and two items containing “plastic” in their names were displayed.
Note: The Search bar is on the top of the list. So, if you scrolled down to the middle of the list, the Search bar might not be visible. Scroll back up to the top of the list to look for the search bar. Also, if you want to see a full search list without the keyboard, the keyboard could be dismissed by touching anywhere of the top title bar.
Settings Page
On the bottom of the screen, touch the Settings tab to get to the Settings page. On the Settings page, you can select Display Options or make General settings changes.
Display Option
On the Settings screen, you can select whether a new item is added to the top or the bottom of the list. By default, if you did not change anything, new items are added to the top so you can immediately see what you have added.
Modify Debby Link
Debby LinkTM is what you use to connect to the Debby Notes backend where your notes are stored and shared between other Debby applications. On the Settings page, touch the arrow at the end of “Modify Debby Link”. This will bring up the Debby Link Control screen. You can sign in to your account or create an account.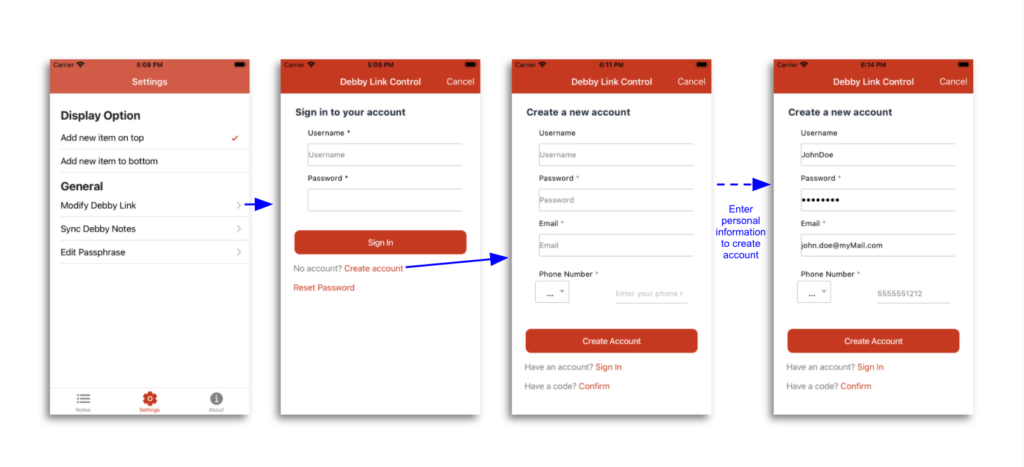 To create an account, you will have to enter a Username, a Password of your choice (8 characters minimum and can contain upper or lower case alphanumeric characters or special characters), email address and phone number.
The email address is used to receive confirmation code for account generation and account recovery. You will also receive Debby Notes updates and other Debby products announcements that you can opt out at any time by replying to the received emails.
The phone number is used for account recovery in case you forgot your password and have no access to the email address that you provided. You can contact support.debbysolutions.com to get a recovery code sent to your phone instead. If you do not want to enter a phone number, just enter any number in the space provided. Note that not providing a valid phone number could cause a problem for account recovery in the future.
You will receive a confirmation code in your email after you touch the “Create Account” button.
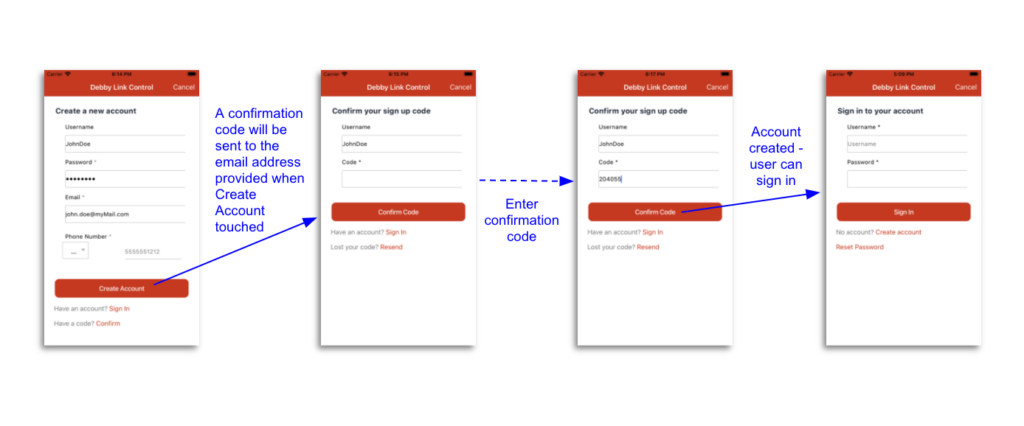
Enter the confirmation code (called verification code in the email) in the “Confirm your sign up code” screen and touch the “Confirm Code” button. You will then be presented with the “Sign in to your account” screen.
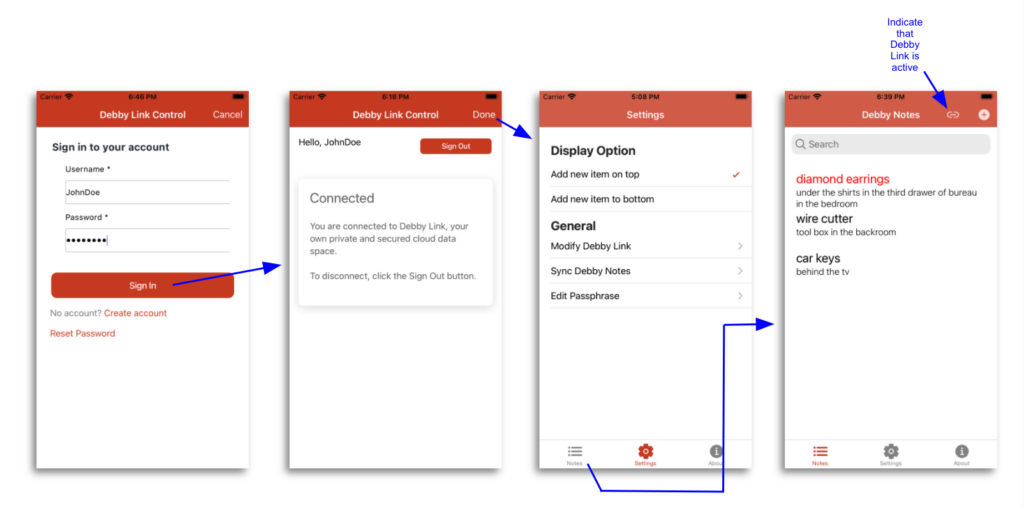
After signing in, touch the “Done” button on the upper right hand corner of the “Debby Link Control” screen to return to the Settings page. Touch the “Notes” tab on the bottom of the Settings screen to return to the Notes page.
Notice the “link” icon next to the “+” sign will now appear, indicating that you are connected to the backend via Debby Link. Also, the “+” sign could be temporarily replaced by a spinner indicating that notes on the Debby Notes mobile app are being synchronized to the backend. This will ensure that all notes are now backed up in the cloud and shared with your other Debby applications that you have logged into the same user account.
Note: If you forgot the password, touch the “Reset Password” button and a new verification code will be sent to you via email. Enter this code with a new password and touch the “Verify” button to change the password.
Sync Account
Since notes about where items are located can also be made from the Debby Notes Alexa skill, and perhaps other Debby applications in the future, the list on the Debby NotesTM mobile app might not be up to date. Touching the arrow on the right of “Sync Debby Notes” will bring up a pop up seeking confirmation to update local notes.
Note: Local notes are synced automatically when the Debby NotesTM mobile app is restarted or if logged out and log back into an account. Also, auto syncing occurs if the mobile device loses and then regains network connection. All note changes that were made when you are logged out or logged in but without network connections will be saved locally and synchronized to the backend when you logged back in or when network connection is restored.
Edit Passphrase
When you touch the arrow on “Edit Passphrase”, the PassPhrase Editor screen will be presented. There are two parts to the passphrase. The number of animals and the animal name.
Hint: Don’t forget to enter the name of the animal in appropriate plural form if the number is more than one, for example, “3” and “monkeys” instead of “3” and “monkey”.
About page
You can get to the About page by touching the About tab at the bottom of the screen.
Besides a brief description of how the Debby NotesTM mobile app is related to other Debby SolutionsTM, the About screen also provides information about the mobile app’s Terms of Service, Privacy Policy and other software licensing related Legal Stuff.
If you have any further questions or suggestions to improved this user’s guide or the Debby Notes mobile app, please email us at contact@pleiadestechnology.com.